Run of the Day
Here is a video I took riding the Screech Owl (black diamond) at Beaver Creek.

No-Fall Snowboarding + White Mountain Snowboarding & Adventure Club
Danny Martin is an international snowboarding instructor and personal trainer located in Avon, CO. He authored the book, No-Fall Snowboarding, and patented an in-home snowboard training device called the Agility Arrow. Danny's training methods are available online via Skype and in person.
Here is a video I took riding the Screech Owl (black diamond) at Beaver Creek.
The new express lift is open and here is a shot of the first snow on Red Buffalo run from the top of Beaver Creek Mountain. The temps are finally dropping and conditions are improving. I hope to see you sometime this season!

Thanksgiving week was a great start to the 2015 / 2016 snowboarding season at Beaver Creek. We saw consistent snow fall throughout the week and conditions were great for this early in the season. You can't complain too much when you have a few powder days in November. Opening day was a real treat since there were several feet of untracked powder to be found throughout the day. It was great to get out and ride with club members and friends.
Here is a quick teaser video of a warm-up run on about 4 or 5 inches of fresh powder at the top of the mountain. I'm shooting the video and Kevin Gallagher, one of my students / club members, is also seen riding in it. Check it out:
I hope everyone is getting excited for the start of the 2015 / 2016 season. We've been getting hammered with snow lately, so it looks like a great start to the season. I'm looking forward to getting back out riding next week on Opening Day. Get in touch with me if you haven't already to set some dates to come on out and ride. It looks like there are going to be a lot of amazing POW days in our near future!

Recent photo of Beaver Creek taken in November that shows off the great early season snow coverage we have so far!
It's October and the magical seasonal transformation of the mountain is well underway. You can smell the coming winter season in the air and already feel the temperature starting to drop. Now is the time to start planning your trips, pick up your season passes and start following the BYGS workout to get your body ready for some riding! Get in touch if we haven't spoken since last season or if you're new to my technique and want to find out more before the season begins.
Here is a recent photo of Beaver Creek during the fall from the top of Larkspur.

It's been a fun season so far. The season started out strong with some epic powder days. The day after Christmas we had over a foot and a half of fresh powder. One of my White Mountain Snowboarding and Adventure Club members was out here and we got to ride in some pretty amazing powder. Early January was also fun with a number of my club members and No Fall students visiting over the long Martin Luther King Jr. weekend. The rest of January and early February were spring like conditions. Finally, the snow has returned and last week we saw a few great powder days. March is usually a great time of year to snowboard, so hopefully the latest trend will continue. I hope everyone is having a great season and definitely let me know if you're interested in coming out to ride!

12/26/14 Powder Day at Beaver Creek: Club member and No Fall Snowboarding student Kevin Gallagher riding in deep powder.
It's that time of year again. You're probably getting your gear out of storage and tuning it for your initial runs. Hopefully you've been getting your body in tune as well. I found this simple workout to be extremely effective to get your body properly prepared for snowboarding. I think this is so important that I dedicated a whole chapter to it in my book and figured I'd share it with you, my faithful readers, as you get ready for the 2014 - 2015 season.
This is a sequence that is designed for ease of use. It can be performed as a single, flowing, uninterrupted groove, like a yoga lesson that seamlessly links beginning, middle, and end. Remember, take it at your speed. My snowboarding workout has been designed so that even a total novice at physical exercise can do it. However, if you think you need to get a clearance from a physician before attempting any exercise program for any reason, please do so. If you have severe neck or knee problems, or feel discomfort in any portion of these stretches or flexes, discontinue the exercise immediately.
Pretty much as described. It's called the "five-minute walk", but the longer you walk...the better.
Begin by walking up and down stairs for two minutes if you can. Increase your stair sessions according to your comfort level.

Start the perfect back stretch, by lying flat on the very back in question. Next, stretch both arms over your head as far as you can. Make sure your palms are face up to the sky, fingers extended.
Take a deep breath in this position, relaxing into the stretch. As you exhale, stretch a little more by pointing your toes and extending your fingers in opposite directions. You're lengthening, elongating your body, as well as stretching the fronts of the lower leg.
Take a few more big, deep breaths in this position. Inhale and exhale until you feel relaxed and find the rhythm of breathing. Imagine, as you take in oxygen, that you're sending it through your body to the muscles feeling the pull.
When I'm in this position, reaching with my toes and fingers, I feel my shoulders rise close to the ears. As my shoulders get stretched, I also feel the muscles that connect my back to my shoulders getting a nice, healthy elongation.
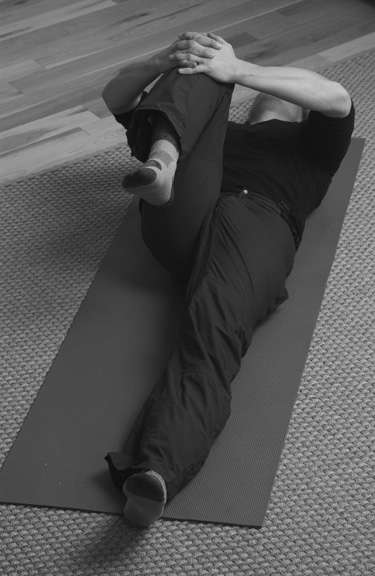
Start with a nice, big breath. As you inhale, draw your right knee into your chest. Grab your knee with both hands. As you exhale, pull your right knee toward your right shoulder. take another breath. As you exhale, try pulling your knee even closer to your right shoulder.
As I stretch, I concentrate on the muscle I'm stretching. As you start to feel it, concentrate on your breathing. Imagine that you are directing oxygen to the place where you feel the stretch. See if the new oxygen allows the muscle to stretch even more.
Take another deep breath. As you exhale, extend and lower your leg to the mat. Take a breath in and exhale. Relax. Take another breath in. Exhale.
Repeat the above exercise with the opposite leg. Draw your left knee into your chest; hold the knee with both hands. Take a deep breath. As you exhale, pull your left knee toward your left shoulder. Take another deep breath. When you exhale, extend and lower the leg to the mat.
Take a couple more deep breaths while flat on your back. ON your final exhale, bring both knees to your chest: you're now ready to segue into the next position.
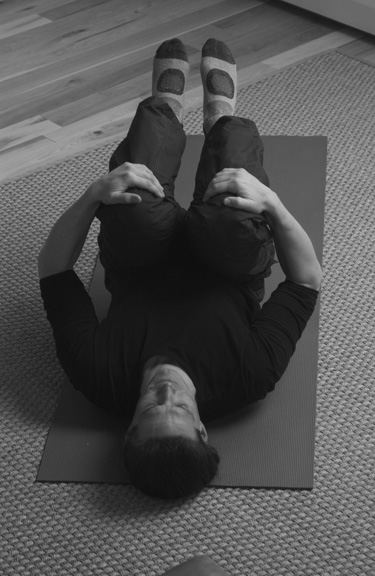
You're still on your back, on the mat. Now draw your knees to your chest, keeping the legs together. Inhale. As you exhale, grab the knees with both hands. You can even interlock your fingers over those knees. Tuck your chin and rock back and forth along the length of your spine. Take nice deep breaths, inhaling and exhaling. As you rock, take your time; try moving over one vertebra at a time. You're further loosening up the muscles in your back.
When this stretch begins to feel more natural, increase your rocking further. Try rocking forward so that you almost (but not quite) come to a seated position. When you rock backwards, see if you can go far enough so the back of your head touches the ground. Spend a minute or two rocking back and forth).

Lie flat on your back, knees bent, soles of your feet flat on the mat. Tuck your chin, then cross your arms across your chest. ready to do some stomach "crunches"? Take a deep breath. Tucking the chin in is important -- this action prevents unnecessary neck strain.
As you exhale, try flexing, or tightening, your abdominal muscles. Feel the crunch This curling action in the stomach should raise your shoulders off the mat one, two, maybe even three inches. Hold that abdominal flex for a second, then inhale as you lower yourself back down again.
Try to make sure your shoulders don't rise any higher than three inches off the ground. Raise your shoulders over three inches and you're exercising your hip flexors, not your abs.
Feel that? Now, repeat this three-part sit-up sequence:
Repeat as many times as your feel comfortable. At the end of your sit-up session, lie yourself down flat on your back. Take a breath. Exhale.

Lie on your mat on your stomach. Relax and put your arms by your sides. palms facing upwards. Take a few breaths. On your final exhale, bend your right knee and reach back for your right foot with your right hand. Pull the right foot down towards your butt. It doesn't matter if you touch your heel to your butt or not. Feels good, doesn't it? Do you feel the stretch along the top of your leg? When you do, relax into it. Take a few breaths, sending oxygen to the stretched muscle.
On an exhale reach back with your left hand to grasp the right foot as well. With both hands on the right foot, use your exhale to increase the pull, intensifying the stretch as much as you feel comfortable. You'll really feel this in your right quads!
Lower your right leg and repeat this sequence with the left leg. When you've finished, rest your arms at your sides and relax. Take a breath or two: get all the oxygen you need, because now you're really going to exert yourself.

Lie face down on your mat. When you're good to go, sit up on your knees. Next, fan the fingers, placing palms flat and wide alongside your ribs, slightly more than shoulder-width apart. You might feel a healthy tension here; I always do. Welcome it.
Keeping your back straight, take a deep breath. As you exhale, push yourself up and off the ground with your arms. Not to nag, but remember to keep that back straight. As you rise up, keep your knees and toes on the ground to support your lower body. Once you've extended your arms to their full length, hold in that position for a berth or two. Inhale as you lower yourself back down.
Because your back is straight, you'll feel some pressure on your knees and hands as they push into the ground - that's good. If you don't keep your back straight, you'll feel more pressure on your toes and know you're not in the right position.
Repeat this sequence as many times as you feel comfortable. Gradually increase the number of push-ups you do each time you exercise.
There are many ways to do push-ups - this is just one. You can balance on your toes, keeping your legs and back in one long line. If you're a member of our armed services, or were traumatized by a particularly hard-ass gym teacher during childhood, then you know what a "marine" push-up is. These variations simply add more leverage to the muscles, making the push-ups harder and giving your muscles a more intense workout.


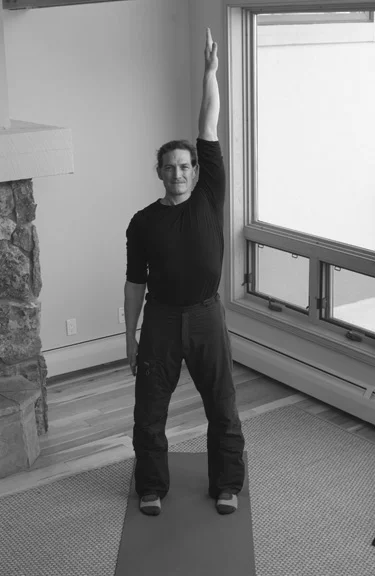
Start in the "Ready Stance": stand straight and tall, hands hanging loose by your sides. Relax your shoulders as well, balancing your head directly over your spine. Place feet shoulder distance apart, the outsides of the feet parallel with each other. Bend slightly at the knees. You don't want your knees locked, because then the muscles in your legs aren't working: you're balancing with your skeletal structure, not your muscles, which are just what we're trying to warm up! The same principle applies to keeping your back straight too.
Take a deep breath. As you exhale, arc your right arm over your head so that your palm faces out, fingers pointing to the sky. At the same time, slide your left hand down the side of your left leg. Stretch that right arm as high as you can. Inhale. On the exhale, lower your right arm and return to the ready position, arms relaxed now at your sides.
Next, repeat this sequence, arcing your left arm overhead and reaching down with the right.
Keep repeating this sequence until it feels natural. At that point, try raising one arm while simultaneously reaching down with the other. Explore your full range of motion, stretching as high as you can without bending your waist. Repeat the sequence for each arm at least ten times.

Assume the "ready stance", but with your back resting against a wall. Make sure your back is flat and straight, with the backs of your heels touching the wall. Make sure you're comfortable and begin strategic breathing. When ready, take a deep breath. As you exhale, bend your knees, sliding your back down along the wall until you feel a stretch in your lower leg.
Make sure your heels remain flat on the floor -- you don't want your heels to lift off the ground at all. If you find your heels lifting, stop and adjust your position.
Hold that position as you take a breath. When you exhale, try relaxing into the stretch a little deeper. After a breath or two in that position, stand up straight into the ready stance.
Then, after a breath, repeat the sequence, putting a few more nice breaths into those muscles.

Assume the ready stance. Stand tall, relaxing the arms at your sides with your feet shoulder width apart. Even out your breathing. Now we're going to give the upper body the stretch it really needs to go riding.
As your breathing settles into a comfortable groove, make sure the outsides of your feet are parallel with the other. You may feel that your heels are slightly flared. This is normal.
Now, reach your right arm straight across your chest at shoulder height, pointing your fingers to the left. With your left hand, reach over your right arm and grasp your elbow. Take a deep breath.
As you exhale, relax your right shoulder while simultaneously pulling your right arm leftwards across your chest. Pull your right arm as far left as is comfortable and possible. Hold here and breathe.
Lower your arms to your sides and relax. Now, repeat the same stretch, but with your left arm.
When you're done stretching the left side, again, rest your arms at your sides. Relax and breathe.

Stand in the ready position. Now raise your right hand straight over your head. Rotate your right hand so that the palm turns towards your ear, and further so that it faces the wall behind you.
Bending at the elbow, reach your right hand down the center of your back.
With your left hand, reach over and grab your right elbow. Take a deep breath. As you exhale, reach down the center of your back as far as you can, supporting and increasing the stretch with your left hand on your right elbow.
Now drop your arms to your sides. Relax. Breathe.
When you feel ready, repeat this stretch sequence from the beginning, but this time stretching the left arm overhead and then reaching back with your left hand.
With your right hand grabbing your left elbow, give your left upper body muscles the same journey through their full range of motion that you just gave muscles on your right.


Now we're really going to stretch the neck. We begin as usual in the ready stance, standing with back straight, feet shoulder width apart and arms relaxed at the sides.
Looking straight ahead, gently tuck the chin down, with the head balanced directly over the spine.
Take a deep breath. As you exhale, tilt your head to the right as far as you can. Take another deep breath.
One the next exhale, relax your left shoulder, allowing your left hand to slide down the side of your left leg. Inhale and exhale again before returning to the ready stance.
repeat this stretch, but this time tilting your head to the left and reaching your right arm down.
Continue this stretch, but modulate it to explore your neck's full range of motion. Start by turning your head halfway to your right shoulder. Take a deep breath. as you exhale, tuck your chin in to your right collarbone, bending the knees slightly. Inhale.
As you exhale, relax both shoulders, sliding the hands down the sides of the legs. Then, while you inhale, stand back up to center.
Repeat the same series of movements for your left side of your body. Finish by returning to the centered alignment of the ready stance.
Now turn and look as far to the right as you can, so that the chin is as close to edging over the right shoulder as possible. Look behind you as far as you can out of the corner of your right eye. Pick a spot and focus on it as you take another breath.
As you exhale, tilt the head back, looking straight up at the ceiling. Take another deep breath.
Now as you exhale, relax the shoulders again and slide both hands down the sides of the legs.
Inhale, returning to the ready stance. Repeat this sequence for your left side.

Begin in the ready stance. Bend the knees slightly and take a deep breath.
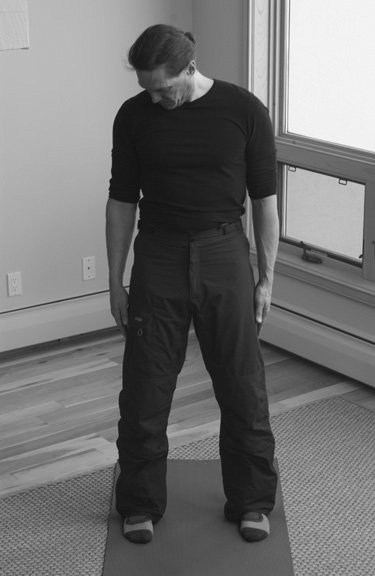
As you exhale, bend at the waist: letting your arms hang freely in front of you, try reaching for the floor. Take two or three breaths here, as this is an important moment in the warm-up: you're stretching the back of your upper leg, as well as giving the lower back one final warm-up.

Begin in the ready stance. Back straight, take a deep breath.
As you inhale, bend at the knees. Lower yourself as far as you can while keeping the back straight and the balls of your feet on the ground.
As you exhale, stand back up. Repeat the squat movement at least ten times. As you get used to doing the movement, add as many additional squats as you can to your repetitions.
Begin in the ready stance. Inhale as you bend at the knees and ankles. Keep the back straight as you lower yourself.
As you bend the knees, begging raising the right hand -- fingers pointing towards the sky, straight up and palm out -- raising the shoulder at the same time.
As my right shoulder is raised along with my hand, I relax my left shoulder even deeper, helping extend my right arm upward in its fullest range of motion.
Once you're fully elongated, pause and take a breath. Upon exhale, return to the neutral ready stance.
Repeat this movement sequence using the left arm. Do at least ten repetitions on each arm, always returning in between to the ready stance.
Now we're going to pick up the pace and tax your coordination-agility abilities a little; if this proves too much, leave this last bit until your body has built up more endurance after a few complete workouts.
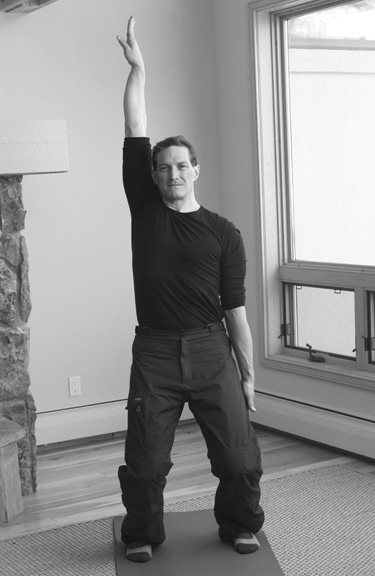
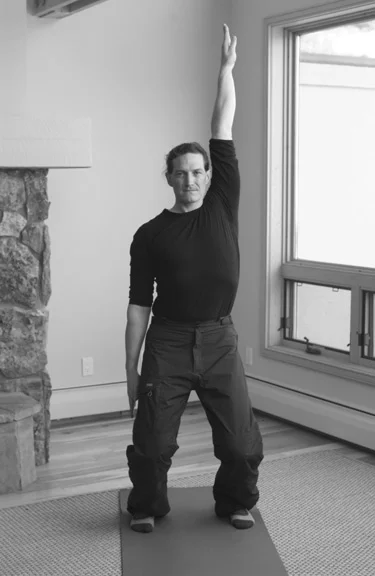
Start in the ready stance. Take a deep breath. as you exhale, raise your right hand way above your head, palm facing out.
Take another deep breath. As you exhale, point the fingers of your right hand toward the sky while simultaneously relaxing your left shoulder, reaching the left hand down that leg. Let the left shoulder follow the left hand down into a stretch, exploring your full range of motion in this position.
This time, as you inhale, simultaneously bend your knees and ankles, lowering yourself down. Keep your back straight and go as low as you can, until you can no longer keep your heels rooted to the ground.
Repeat this sequence at least ten time -- more if you can. Inhale as you return to the ready stance.
Congratulations! You've completed my BYGS workout and are priming your body for snowboarding. Keep this up for several weeks and you should be ready to ride in no-time. Let me know if you have any questions in the comments.
Welcome back everyone. It's time to shake off those cobwebs and get those riding legs ready for another great season. I just got back from my final hunting trip and I'm happy to say that I was able to land two elk (1 during bow season and another during rifle season -- with a bow).
But on to more important things...Last week was huge for Colorado! The Indian Summer is finally over as Ullr graces us with his presence and sends the polar vortex down our way. We saw between 3 to 4 ft. of snow last week alone and things are looking good this coming weekend. Opening day at Beaver Creek on 11/26 should be one to remember.
Looking forward to one of my No-Fall Snowboarding students coming out to shred with me over Thanksgiving. As the wise Rowdy Roddy Piper once said "I have come here to chew bubblegum and kick ass...and I'm all out of bubblegum!"
Let's get this season started!
-Danny